Howto: beginner reactor
(c) 2014 Lisimba
lisimba@lisimba.org
This howto tells you how to make a safe and fairly cheap pebble bed High Temperature Gas Reactor using the Minecraft mods RotaryCraft and ReactorCraft. The design is suitable for people who haven’t built a reactor before and who want to get started tinkering with nuclear energy. I’m focusing on the mods as they appear in the FTB Monster pack (v.1.1.1) as that’s the one I play, but the techniques presented here should work everywhere, possibly with some minor adjustments. [A] [A] As long as you use the same RotaryCraft and ReactorCraft versions as I do. If things change significantly in future versions, all bets are off.
I’m not telling you how to make the individual blocks, you can consult NEI [B] [B] Not Enough Items, a mod that’s also in the FTB Monster pack. or the ingame RotaryCraft/ReactorCraft handbooks for that. This howto is about how to combine the blocks into a good reactor that’ll let you progress your base into the atomic age.
 This work is licensed under a Creative Commons Attribution-ShareAlike 4.0 International License (http://creativecommons.org/licenses/by-sa/4.0/).
Document version: 1, 9 may 2014
Table of Contents
1 Intro
The reactor we’re building in this howto has these requirements:
Safe: if you accidentally destroy a coolant line or forget to do maintenance, the reactor should shut down or sit there wasting fuel. At worst it might destroy some easily replacable parts. It should not turn your base into a radioactive crater. That said, there are a few pointers on how you can make your reactor more efficient but less safe.
Fairly cheap: we’ll start building approximately the minimum you can get away with and still have a functional reactor. From there you can upgrade various components.
Efficient: when you just enter the atomic age, you probably don’t have an abundance of fuel yet. We don’t want to waste it for no good reason.
Understandable: I’m not just giving you a blueprint and telling you to assemble it. My aim is for you to understand what you’ve built, so you can tinker with it and upgrade it to meet your needs. However, if you care more about getting a reactor to work than about understanding how and why it works, you can skip all the sections marked with TL;DR:
If you want to get started, read on.
2 Prerequisites
2.1 Mod versions
I’m using the FTB Monster pack version 1.1.1, based on Minecraft 1.6.4. It contains ReactorCraft and RotaryCraft version 19b. If you use a different version or another modpack, be aware that you may have different bugs or features.
2.2 Your tech level
Your base’s tech level should be high enough that you can produce several stacks of HSLA steel. You must also be able to make TRISO fuel pellets.
2.3 Biome choice
The biome you build your reactor in actually matters, as they can vary in ambient temperature. Most biomes have an ambient temperature of 25 C, and this howto assumes you’re building your reactor in such a biome. If you check the temperature of an idle piece of reactor [C] [C] In the Monster pack you can just look directly at the block from close up. The WAILA tooltip at the top of the screen includes the block’s temperature. You can also use RotaryCraft’s angular transducer - just right click the block with it. and it shows as 25 C, you’re fine. If it’s different you’re probably still fine, but it might just push you outside certain safety limits. Be cautious.
3 Layout and high level view
Your reactor contains several parts:
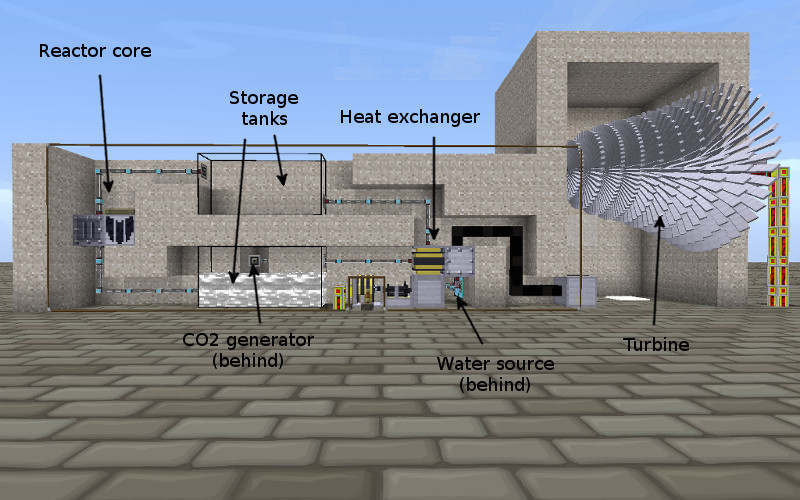
Plumbing: CO2, water, and steam need to be moved around. Discussed in Section 4↓.
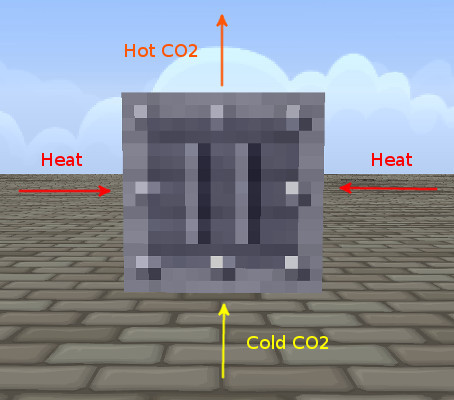
Reactor core: this is where the action happens. Fuel pellets and cold CO2 goes in, hot CO2 comes out. It also produces spent pellets, which are waste. Contains a heat exchanger but is not the heat exchanger. Discussed in Section 5↓.
Heat exchanger: hot CO2 and water go in, cold CO2 and steam come out. Not to be confused with the heat exchanger in the reactor core. Discussed in Section 6↓.
Turbine: steam goes in, rotary power comes out. The steam also comes out again but just gets dumped as waste. Discussed in Section 7↓.
Water source: the heat exchanger needs a constant supply of water. Discussed in Section 8↓.
CO2 generator: a simple but crucial part, you need it to create your supply of CO2. As the CO2 loop is closed (it moves around but doesn’t get used up) you only have to run it when you’re first starting up the reactor. [D] [D] Or after you mess up and destroy some CO2. Still, it’s cheap, so don’t let that bother you. Discussed in Section 9↓.
Storage tanks (optional): it’s useful to have storage tanks for the hot and cold CO2, to act as buffers and to let you see at a glance how much of each you have. A hot CO2 tank also makes a decent “battery”. Discussed in Section 10↓.
Condenser (optional): you could use one of these to turn steam back into water and close the H2O loop as well. Since water is so easy to get by, I’m not going to bother with them.
You’ll also have several moving parts.
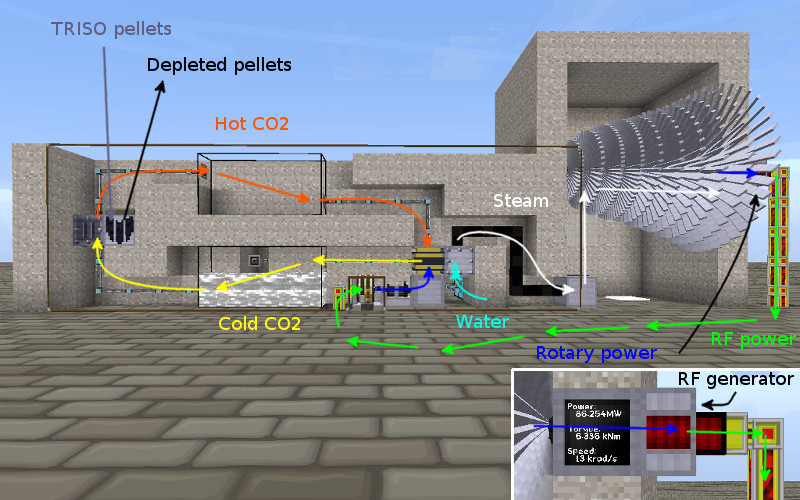
Water: just regular water. It’s turned to steam by the heat exchanger.
CO2: carbon dioxide gas. Regular carbon dioxide, normal carbon dioxide, cold carbon dioxide. All the same. Point is, it’s not hot.
Hot CO2: hot carbon dioxide gas. This is what cold CO2 becomes after it’s put through a CO2 heat exchanger.
TRISO fuel pellets: these go into the reactor core and turn into heat. Also referred to as fresh pellets. Will become depleted pellets after a while.
Depleted TRISO fuel: these have to be removed from the reactor core to make space for more fresh pellets. You can make a hazmat suit out of them.
Heat and temperature: these are used interchangeably. This is wrong in reality but since things are somewhat simplified here it works. Parts of a reactor transfer degrees celsius to each other, not joules [E] [E] If you don’t know what a joule is you might want to look it up, but for this howto it doesn’t matter..
3.1 Mixing and matching
You can always extend a reactor by adding more parts. If you need more energy, just build another reactor module. If your heat exchanger can’t keep up, build a second one. Just make sure to hook it up properly, and use the performance numbers (this howto is full of them) to make sure you’re upgrading whatever is your current bottleneck. You can match up the most important blocks like this:
| Pebble bed reactor core blocks | Steam boilers | Steam grates | ||
| 1 | = | 0.28 | = | 0.56 |
| 3.57 | = | 1 | = | 2 |
| 1.79 | = | 0.5 | = | 1 |
Here are two examples (the designs are explained later):
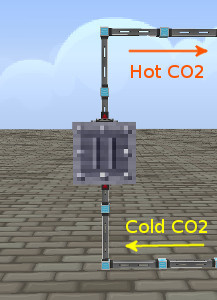
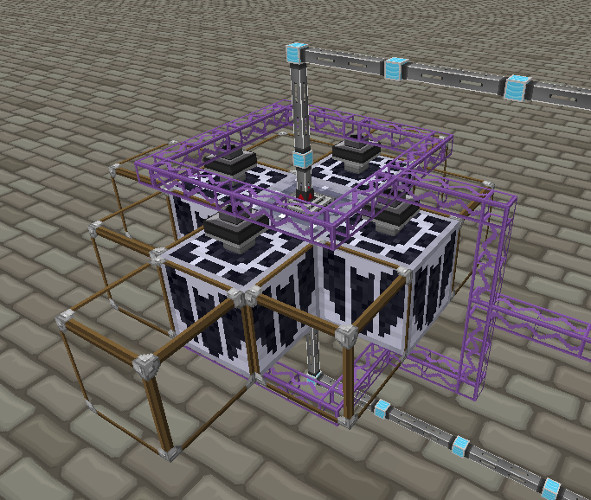
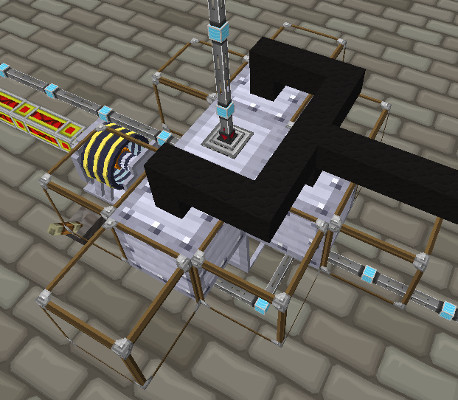
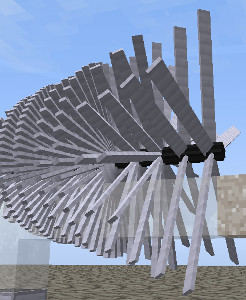
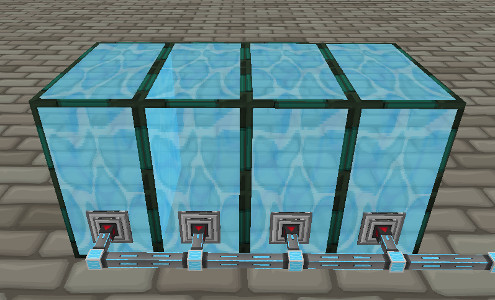
Minimal: reactor core design A1 or B1 (one pebble bed reactor core block), heat exchanger design A1, and one turbine. The turbine will not receive full steam, but this is the smallest (and cheapest) fully working reactor. You can see an example in Figure 1↑.
Quadruple: reactor core design B4, stacked in a double layer, with one reactor missing (so a total of seven pebble bed reactor core blocks), heat exchanger design A2, four turbines. The parts of this setup match up nicely, everything is almost at full capacity with the turbines running at about 97%.

3.2 Things that don’t work
TL;DR: just skip this part.
Things that don’t work - or, why do we need all these parts?
Things that don’t work - or, why do we need all these parts?
3.2.1 Skip the entire CO2 loop
You might wonder why we don’t just put the steam boilers right next to the reactor core and skip the CO2 step. The reason is simple: the reactor core gets confused and refuses to heat up. I’m not sure if this is a bug, but it simply doesn’t work.
3.2.2 A CO2 heat exchanger but no CO2 loop
How about putting a CO2 heat exchanger next to the reactor core, and then a steam boiler next to the CO2 heat exchanger, effectively using the CO2 heat exchanger itself as a heat conductor? Yes, this actually works - but it’s rigged. The setup will explode as soon as the boiler reaches 300 C, which is way below what it can take normally. If your water supply breaks or can’t keep up, you’re in trouble, so it’s not safe and doesn’t conform to our criteria.
Besides, it feels like cheating. This setup isn’t how the reactor is supposed to work.
3.2.3 Skip the reactor core
How? By using the nether. The nether has an ambient temperature of 300 C (at least as far as ReactorCraft thinks), more than enough to boil water. However, the steam boiler only boils if it’s more than 50 C above ambient temperature, so you can’t get infinite heat out of the nether.
4 Plumbing
TL;DR: Use ReactorCraft steam lines for steam. Use Thermal Expansion fluiducts for everything else unless you can afford Ender IO fluid conduits, then use those. Skip the rest of the plumbing section.
4.1 About plumbing
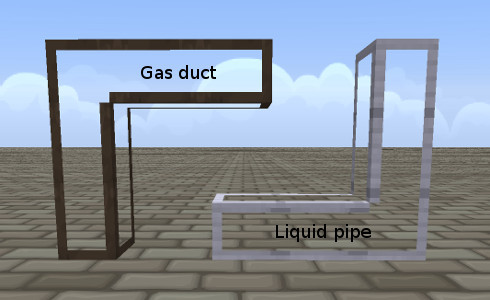
For this reactor you need to move hot CO2, cold CO2, water, and steam around. Steam can only be moved by ReactorCraft steam lines. As for the rest, if you want to stay with RotaryCraft you can use the liquid pipes and gas ducts it provides, but those are quite slow at moving things around. Their throughput and capacity is also not as easy to calculate as that of other pipe systems.
FTB Monster has at least a dozen different ways of moving liquids around. I haven’t fully evaluated them all, so I suggest you use whichever you like (or understand) best. That said, I’ll briefly discuss a few options here.
Note: if you build anything where the performance numbers I give here matter, you should verify them yourself. Like I said, I haven’t fully checked everything, and things may change from version to version, from modpack to modpack, and from server administrator to server administrator.
If you can’t figure out how to use some of these plumbing systems (which is quite possible as certain things are not very intuitive), find a howto or mod spotlight. Explaining that in detail is beyond the scope of this howto.
4.2 RotaryCraft (CO2 and water)
Liquid pipes and gas ducts are what you need if you stay with RotaryCraft. Water goes through liquid pipes and both types of CO2 go through gas ducts. They are fairly slow and tend to store a large amount of fluid before letting anything out at the other side, especially if the connections get long.
4.3 RotaryCraft (steam)
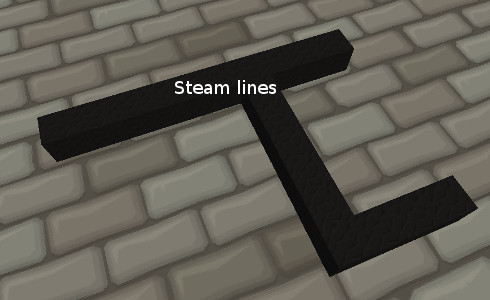
RotaryCraft steam lines are the only thing that can transport RotaryCraft steam, as this steam isn’t a fluid.
Every steam line block has its own internal steam “tank”, which can contain an infinite amount of steam. Every tick, a steam line will try to grab all steam from adjacent boilers, and then it will try to take steam from adjacent steam lines in order to reduce the difference in their steam amounts. Similarly, the other steam lines will try to take steam from this block (before or after, depending on how Minecraft has happened to schedule them).
If no steam is taken out of a network of steam lines, eventually they’ll all contain the same amount of steam (give or take a little, as they can’t divide one steam into parts). If steam goes in at some point and is taken out at some other point, the steam lines will end up with a pressure gradient and steam will move through them.
4.4 Thermal Expansion
This mod provides you with fluiducts. It doesn’t matter if you use regular or opaque versions, but presumably the opaque ones cause a little less lag.
Fluiduct networks [F] [F] A fluiduct network is a bunch of connected fluiducts. will store 10 buckets of CO2, or 3 buckets of water, per fluiduct that connects to something else. It doesn’t matter how long your network is. Fluids are instantly available everywhere.
A fluiduct connection with a servo installed can extract 400 mB/t of CO2, or 120 mB/t of water, from a connected container. A fluiduct block can distribute this same amount per tick among its exit connections.
Usage hints: whack connections with a wrench until they look right. Install servos by right clicking a connection with a servo in your hand. Get to the configuration UI by right clicking a connection with an empty hand. The redstone control settings are in the red box hanging off the right side. You’ll usually want control status set to disabled, making it pump continuously.
4.5 Ender IO
This mod provides you with fluid conduits and pressurized fluid conduits. If you choose to use them I suggest you go with the pressurized ones as they can move fluids against gravity and are faster. Everything in this section assumes you use the pressurized version.
A fluid network can store one bucket per conduit, so longer networks can store more. Fluids appear to be available instantly everywhere.
A pressurized fluid conduit can extract 100 mB/t from an adjacent container. It can insert seemingly unlimited amounts into a container each tick, although it is of course limited by how much it can extract elsewhere.
Usage hints: whack everything with a yeta wrench until it looks right. Get to the configuration UI by right clicking conduit bundles, the big square things that touch the tanks you connect to. Usually you’ll want to set them to extract mode, with redstone mode always active.
4.6 ExtraCells
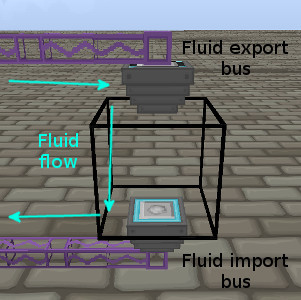
This mod, an addon to Applied Energistics, is probably the most high end option. You need an ME network with fluid infrastructure in it (a fluid disk somewhere, or perhaps a few big tanks with fluid buses).
The storage of the ME network is limited only by how much you want to spend on it. A 64 k fluid storage disk can store 16384 buckets (of up to 5 types of fluid). Fluids are available instantly everywhere.
A fluid import or export bus can transfer at one of three speeds (though it’ll always do a transfer once per second):
| Mode | mB/t | mB/s | energy/s |
| drop | 20 | 400 | 5 |
| quart | 250 | 5000 | 30 |
| bucket | 1000 | 20000 | 60 |
5 Reactor core
TL;DR: you can read just the TL;DR bits of the technical details but don’t skip the rest of this section. Which design you want to build depends on your resources and requirements, see Which design to pick?↓.
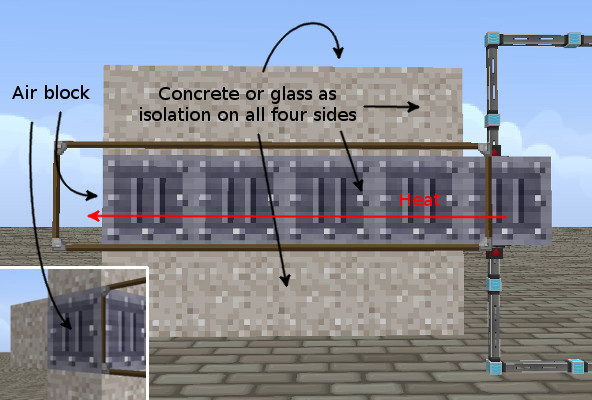
There are many different designs for a reactor core [G] [G] A multiblock structure named after its main component, the Pebble Bed Reactor Core block., each with their own tradeoffs. They all have several things in common though. There’s at least one pebble bed reactor core block, and at least one carbon dioxide heat exchanger. Furthermore there’s plumbing to move CO2 through the heat exchangers, and some way to get pellets in and out the reactor cores. Finally, you need proper application of isolation in order to not waste heat.
5.1 The pebble bed reactor core block
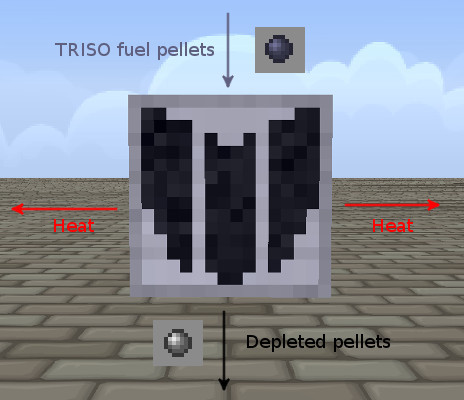
Since we’re making a pebble bed reactor, we need at least one pebble bed reactor core. You give this block TRISO fuel pellets and it will slowly convert them to depleted pellets and heat.
5.1.1 Technical details
TL;DR: core should touch heat exchanger and no air blocks. You need to feed it new pellets occasionally.
A pebble bed reactor core may contain up to 47 TRISO fuel pellets but doesn’t care how many pellets there actually are. As long as there is at least one non-depleted pellet, it works. Extra pellets won’t make it work faster and the presence of depleted pellets won’t make it work slower.
A pebble bed reactor core may contain up to 47 TRISO fuel pellets but doesn’t care how many pellets there actually are. As long as there is at least one non-depleted pellet, it works. Extra pellets won’t make it work faster and the presence of depleted pellets won’t make it work slower.
Assuming it’s working, every tick there’s a 7% chance of a fission event, which will add 20 C (temperature) to the block. Furthermore, if a fission event happens, there’s a 3% chance that the lowermost pellet in the reactor’s inventory degrades by one step. Once a pellet has degraded 25 times, it becomes depleted TRISO fuel and is, basically, a waste product.
From this we can calculate some data. A full inventory has 47 pellets * 25 events ⁄ pellet = 1175 events before it’s empty. By statistics [H] [H] http://www.wolframalpha.com/input/?i=negative+binomial+distribution+n%3D1175+p%3D0.07*0.03 that should last you about 558349 ticks, or seven hours and 45 minutes. Similarly, one pellet will usually last you a bit under ten minutes, though this can easily vary by several minutes.
You need a way to put fresh pellets in the core, and to take depleted pellets out. You can automate this with any of the item transport mods (I recommend Applied Energistics). Insert pellets via the top and extract pellets via the bottom. The core will automatically only let you extract depleted pellets.
If you are short on materials or time, or want a minimal build for some other reason, it’s perfectly viable to just put the pellets in by hand or maybe by hopper. Your only consideration is to not break air isolation (see Air isolation↓)
Some more statistics [I] [I] http://www.wolframalpha.com/input/?i=+binomial+distribution++p%3D0.07+n%3D20 show that the reactor block will produce about 1.4 fission ticks per second, and therefore about 1.4 ticks * 20 C ⁄ tick = 28 C per second, so the cooling system needs to be able to take away at least this much.
It’s true that there might be quite some variation from second to second, but the reactor has a considerable heat capacity so it’ll work out over a longer duration without immediately blowing things up if you ever get a (rare) second with a dozen or so fission ticks in it.
A reactor core block distributes heat to many other ReactorCraft blocks, including ones that belong in other reactors. Generally you only want a pebble bed core to touch other pebble bed cores and CO2 heat exchangers, though.
A reactor core block needs to be isolated from air, see Air isolation↓.
The reactor core block will overheat when it reaches a temperature of 4400 C. It will turn into a block of flowing lava and any pellets in it are lost. Fortunately it doesn’t emit any radioactivity, so this is easy to recover from. Just place a new reactor core block (you don’t even have to remove the lava) and try not to overheat it again.
5.2 The carbon dioxide heat exchanger block
Not to be confused with the heat exchanger from Section 6↓. This one moves heat from the reactor core into CO2, the one from Section 6↓ moves it out of the CO2 and into water.
5.2.1 Technical details
TL;DR: heat exchanger should touch cores but no air blocks. Up to four cores per heat exchanger is okay. Normal CO2 goes in the bottom, hot CO2 comes out the top.
A CO2 heat exchanger needs to be fed regular CO2 gas via the bottom, which will go into a 12 bucket internal tank (tank 0). If the exchanger is 800 C or hotter, it’ll turn some of the CO2 into hot CO2, which will go into a second internal tank (tank 1). The second tank also has a 12 bucket capacity.
A CO2 heat exchanger needs to be fed regular CO2 gas via the bottom, which will go into a 12 bucket internal tank (tank 0). If the exchanger is 800 C or hotter, it’ll turn some of the CO2 into hot CO2, which will go into a second internal tank (tank 1). The second tank also has a 12 bucket capacity.
The heat exchanger will try to transfer heat into the CO2 once each second. It will only transfer if there is at least 100 mB of regular CO2 available in tank 0, and of course the block itself needs to be >= 800 C. It will then turn 100 mB of regular CO2 into 100 mB of hot CO2, which lowers the temperature of the block by 117 C.
From this you can see that at maximum capacity, the heat exchanger can handle 117 C per second, needs 100 mB of regular CO2 per second (and can thus run two minutes without being connected to a CO2 supply if starting from a full tank), and produces 100 mB of hot CO2 per second. This also means that a single CO2 heat exchanger can handle the output of just over four pebble bed reactor cores, as those would produce 28 C * 4 = 112 C each second.
Very similar to a pebble bed reactor core block, a CO2 heat exchanger distributes heat to many other ReactorCraft blocks, and needs to be isolated from air.
A CO2 heat exchanger does not appear to have a maximum temperature. Although it seems a maximum temperature of 4000 C was intended, this isn’t actually enforced.
5.3 How to build a reactor core
I’ll show two reasonably good designs here, with some possible tweaks for each.
The first design (design A) uses passive cooling and can’t overheat if the cold CO2 supply stops. However, this comes with an efficiency penalty of about 16 to 52 percent, depending on the design specifics.
The second design (design B) runs at maximum efficiency but can overheat if the cold CO2 supply stops. There are several things you can do to reduce or even eliminate this risk though.
5.3.1 Which design to pick?
You decide. B1 is the cheapest, B4 is the best.
Design A is inherently safe [J] [J] If built properly, of course.. Design B is not inherently safe but can be made safe with extra work.
Two pebble bed reactor cores at full efficiency power approximately one turbine fully, but a turbine will work with less, it’ll just not run at full power. You need 50 C/s to run a turbine, assuming no loss [K] [K] That’s optimistic of course. With good reactor design there may be one or two C lost along the way because the CO2-to-steam heat exchanger always loses some.. B2 fully powers one turbine with a little left over, B4 powers two (again plus a little). A1 and A2 can’t fully power one. A3 can power one and (almost) a half.
Design A wastes some heat. Design B is 100% efficient.
5.3.2 Design A and B: the center
Both designs have a carbon dioxide heat exchanger at the center. The variations are in what touches the four horizontal faces of the heat exchanger, with the difference between A and B being the passive cooling system.
- Place a carbon dioxide heat exchanger somewhere. Make sure it’s the right type, not a regular heat exchanger.
- Hook up a cold CO2 supply to the bottom.
- Hook up something to extract the hot CO2 from the top.
5.3.3 Design A: passive cooling
The passive cooling system is, simply, a row of four CO2 heat exchangers extending from the central CO2 heat exchanger. Make sure they are all isolated properly, except the furthest one. That one should touch one (or more) air blocks. They should not be hooked up to any CO2 pipes; they work simply by being there.
This setup works by transferring heat along the exchangers until the furthest one dumps it into the air. Since the amount of heat lost to the air is proportional to how hot the exchanger is, it stays limited during normal use. Once the cold CO2 supply stops, the whole setup will heat up until the final heat exchanger is so hot that it dissipates all generated heat to the air.
The longer the row of exchangers is, the more difficult it is for heat to travel out that way, and the more heat stays where it can be used. If the row is too long, too much heat will stay in the center however, and it may overheat, and that is exactly what we do not want.
Four is the maximum you can get away with reliably in an A3 design, as far as I tested. You can get away with more for an A2 or A1 but it starts to look silly.
5.3.4 Design A1, A2 and A3
Once you have built a center (Design A and B: the center↑) with cooling system (Design A: passive cooling↑), the heat exchanger has three faces left. Place a pebble bed reactor core against at least one of them, and make sure neither the reactor cores nor the center heat exchanger are touching any air blocks.
You may want to hook up a way to insert and remove fuel pellets. See Pellet logistics↑.
| Design | Cores |
Efficiency [L] [L]
Compared to a design B with the same amount of cores.
|
Useful heat production [M] [M]
That is, the heat that isn’t wasted by the passive cooling system.
|
Hot CO2 production |
Max temperature [N] [N]
If the cold CO2 supply fails.
|
| A1 | 1 | ~48% | ~13.5 C/s | ~11.5 mB/s | ~900 C |
| A2 | 2 | ~68% | ~38 C/s | ~35 mB/s | ~1050 C |
| A3 | 3 | ~84% | ~70.5 C/s | ~60 mB/s | ~4100 C |
5.3.5 Design B1, B2, B3 and B4: maximum efficiency
Build a center (Design A and B: the center↑). The heat exchanger has four available faces and is entirely capable of dealing with the heat output of up to four pebble bed reactor cores, so place whichever amount you need.
Make sure neither the reactor cores nor the center heat exchanger are touching any air blocks.
You may want to hook up a way to insert and remove fuel pellets. See Pellet logistics↑.
| Design | Cores | Heat production | Hot CO2 production |
| B1 | 1 | ~28 C/s | ~24 mB/s |
| B2 | 2 | ~56 C/s | ~48 mB/s |
| B3 | 3 | ~84 C/s | ~72 mB/s |
| B4 | 4 | ~112 C/s | ~96 mB/s |
5.3.6 Design B: preventing overheating
If the reactor core overheats, the pebble bed reactor cores will turn into lava. The rest of the reactor is generally heat proof (unless you built it out of wood or something) but it’s still kind of a waste. If you are rich you may not care and have spare cores on hand, but even then it’ll interrupt your power production and that’s just annoying. So, how to deal?
If your heat exchanger (the hot CO2 to steam one) is powerful enough, it’ll turn all generated hot CO2 right back into cold CO2. This does require that your water supply can always keep up, and the power supply for the heat exchanger must not fail either. If you trust all these systems though, you won’t have to worry about overheating.
An active pebble bed core with no cooling whatsoever will overheat in about two minutes. If there is a heat exchanger with some buckets of CO2 left in it, it’ll take at least several minutes more: a bucket of CO2 is worth about 41 seconds for a single active core. If you have reasonably sized hot and cold CO2 tanks right next to the reactor, it can go for hours even if your CO2-to-steam heat exchanger stops working entirely. See also Storage tanks↓.
ComputerCraft computers can use reactor blocks as peripherals and read their temperature. All you need is a small program that uses a piston to open some of the isolation, letting heat out. This does waste energy but it’s likely better than losing an entire pebble bed core plus inventory of pellets to lava.
To use the program below, place a ComputerCraft computer so its back is against the side of one of the pebble bed reactor core blocks. Then place a piston to the left of the computer so that when it extends, the piston head is next to another side of the pebble bed reactor core block. Then save the program to a file called “startup” in the root directory of the computer and reboot it.
core = peripheral.wrap(’back’)
while true do
    if core.getTemperature() < 1500 then
        redstone.setOutput(’left’, true)
    else
        redstone.setOutput(’left’, false)
    end
    os.sleep(1)
end
Every second the program checks the temperature of the core and keeps the piston extended as long as the temperature is below 1500 C. Since a piston head counts as not-air, no heat is lost. If the cold CO2 supply breaks, the core will heat up, and the piston will retract, exposing the core to air. This is enough to prevent an entire B4 design from overheating. Once the cold CO2 supply is restored the core will cool down and the piston will extend again, restoring normal efficiency.
This is a very minimal script, feel free to make it more fancy. You could add a remote warning system, a temperature display, logging, and any amount of other features.
If for some reason the program doesn’t activate when the computer starts, or if the computer doesn’t start at all, the piston stays retracted and thus the reactor is still safe, though wasting heat. Be warned though, if the program crashes while the piston is extended, it won’t retract.
5.3.7 Stacking
TL;DR: you can stack reactor cores and heat exchangers for space efficiency, but don’t stack more than two layers if you are OCD about your reactors working at top efficiency as they may jam for a short time due to spent pellet buildup.
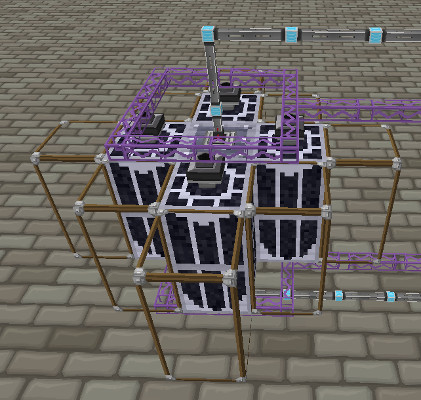
You can stack both CO2 heat exchangers and pebble bed reactor cores. The heat exchangers will pass both types of CO2 up, so an entire stack of exchangers will get cold CO2 from the bottom and output all hot CO2 at the top (make sure your plumbing is up to the task though). The reactor cores will pass all TRISO pellets down so you can feed a stack at the top and take out depleted pellets at the bottom.
Unfortunately, due to the way the reactor cores pass down spent pellets, you can’t guarantee that a reactor somewhere in the middle of the stack will always have fissionable pellets. A reactor appears to always pass the bottommost pellet on, be it fresh, spent, or somewhere halfway. Pellets enter at the top though. The bottommost reactor will always dump spent pellets, no matter where in the inventory it is, but in the other reactors the spent pellets have to work their way down through the reactor’s inventory. Once reactors start passing each other loads of half to fully spent pellets, it’s possible for one of the reactors to deplete its entire load, and it can’t get rid of anything until the reactor below that has an open space.
A practical example, to make this clearer. Suppose you have three stacked reactor cores, all starting full of fresh pellets. Due to random chance they won’t all run at exactly the same speed. Suppose that the top one runs slightly faster than the bottom and middle cores, and that the bottom one runs slightly faster than the middle core (so the middle one is the slowest). Since the top one is the fastest, it will start building up a small backlog of spent pellets. Whenever the bottom one depletes a pellet it’ll take the nearly depleted bottommost pellet from the middle core (which, being just a little slower, was almost done with it). The middle core will then take a spent pellet from the top core, and start fissioning the next fresh pellet in its inventory.
Once this goes on for a while (and assuming they don’t catch up to each other), all reactors will have ran through their initial inventory of fresh pellets. The bottom reactor is now full of nearly spent pellets from the middle reactor, and the middle reactor is now full of entirely spent pellets from the top reactor and will stop working. The top reactor has been fed fresh pellets from storage all that time and is fine.
Of course this situation will resolve itself soon. Once the bottom reactor depletes one of the nearly spent pellets it’ll get rid of it and start taking in the spent pellets from the middle reactor, which it’ll immediately get rid of too. This will flush out the whole lot of spent pellets and all reactors will run again.
And certainly things could have gone in any number of different ways. Maybe the middle reactor would have caught up halfway through. Maybe the bottom one was always the fastest. Maybe they kept varying speeds. This is mostly just theoretically possible.
A two layer setup will not jam unless the top reactor manages to finish off all pellets in its inventory before the bottom reactor finishes off one. This is so unlikely it’s effectively impossible and you won’t have to worry about it happening.
5.4 Troubleshooting
5.4.1 Check the isolation
If the reactor core seems unusually inefficient, check that there are no parts exposed to air.
5.4.2 Check the core block’s inventory
A pebble bed reactor core should have at least one non-depleted TRISO fuel pellet to work.
5.4.3 Check the heat exchanger’s tanks
Tank 0 needs at least 100 mB of carbon dioxide gas or the heat exchanger won’t work. If it doesn’t have that, check your plumbing and fluid storage.
Tank 1 needs to have at least 100 mB of empty space or the heat exchanger won’t work. Ideally the tank should be empty. If it’s not empty, check your plumbing and fluid storage.
6 Heat exchanger
The heat exchanger [O] [O] A multiblock structure named after its main component, the heat exchanger block. is easier to deal with than the reactor core. If built properly it can’t fail. If built improperly though, it can waste a lot of energy.
6.1 The heat exchanger block
This block takes the hot CO2 generated in the reactor and turns it back into regular CO2, heating itself up in the process.
6.1.1 Technical details
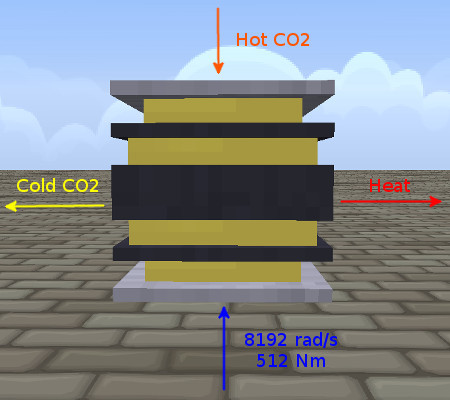
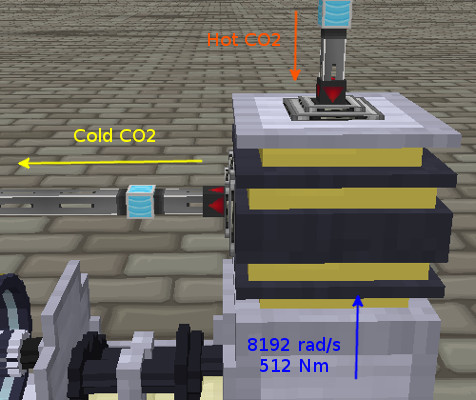
TL;DR: 8192 rad/s and 512 Nm in the bottom, hot CO2 in the top, regular CO2 out one of the sides, up to three other sides available for a boiler.
The heat exchanger block takes hot CO2 (input via the top), which goes into a 2 bucket internal tank (tank 0). It turns it into regular CO2 (extract via a side), which goes into another 2 bucket internal tank (tank 1). This heats up the block. It needs to be provided with enough RotaryCraft power or it won’t work.
The heat exchanger block takes hot CO2 (input via the top), which goes into a 2 bucket internal tank (tank 0). It turns it into regular CO2 (extract via a side), which goes into another 2 bucket internal tank (tank 1). This heats up the block. It needs to be provided with enough RotaryCraft power or it won’t work.
You need to provide the heat exchanger block with 8192 rad/s, 512 Nm, via the bottom. You can feed it more but that’s wasted, it won’t work any faster.
It’s important that you have a way of providing this power (for at least a short time) that doesn’t depend on the reactor already working, otherwise you can’t start it up. A RotaryCraft magnetostatic engine set to full power, with a (lubricated!) steel 4:1 gearbox set to speed mode (it’s in torque mode by default, shift-click it with a screwdriver), is enough. The engine can trickle charge on whatever RF source you have available, if you use the redstone control to make it run only when it receives a signal. All you need to turn it on then is a lever.
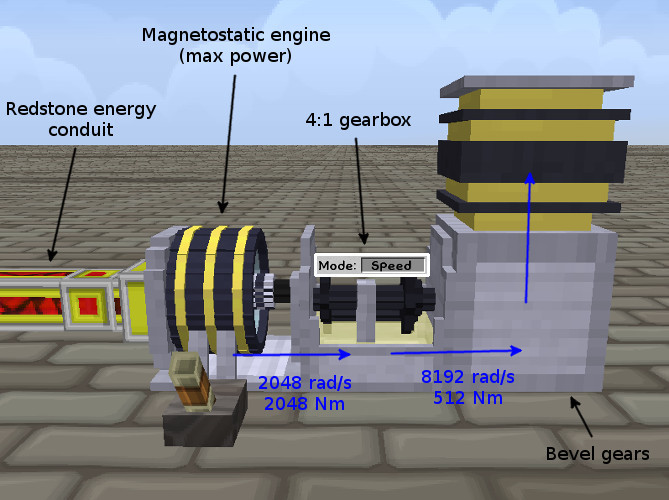
Once your reactor is running you probably want to power the heat exchanger from a turbine. Dedicating an entire turbine to it is easy but quite wasteful. A better option is to have a turbine power a set of rotational dynamos, generating a large amount of RF power for the magnetostatic engine and the rest of your base. You can also use different power systems of course. That’s beyond the scope of this howto and up to you.
The heat exchanger will try to turn hot CO2 into heat (and regular CO2) every tick [P] [P] Which makes it 20 times as fast as the reactor core’s heat exchangers, which only work once a second.. Like in the reactor core, 100 mB of hot CO2 is worth 117 C. It will not do anything if it’s already over 800 C, though, so it regulates its own speed and won’t overheat [Q] [Q] It might get up to a max of 917 C, but that’s it.. It won’t waste hot CO2 either, that just sits in the internal tank until needed.
The heat exchanger does not cool faster when exposed to air blocks, though I recommend isolating it anyway for consistency and because that may very well change in future updates. It does lose a little heat (1 C to 2 C per second) as long as it’s hotter than the ambient temperature, but you can’t help that.
Every second the heat exchanger will attempt to distribute heat to boilers horizontally adjacent to it (so north, south, west and east). It’ll move a quarter of the temperature difference between itself and the first boiler into that boiler, then a quarter of the temperature difference between itself (which is now cooler) and the second boiler into the second boiler, etc. This has the peculiar result that one of the boilers is favored more, but in practice that matters little.
Since it can generate 117 C per tick it could in theory generate 2340 C per second. That won’t happen though as it can’t transfer the heat away nearly that fast. The steam boilers are the bottleneck.
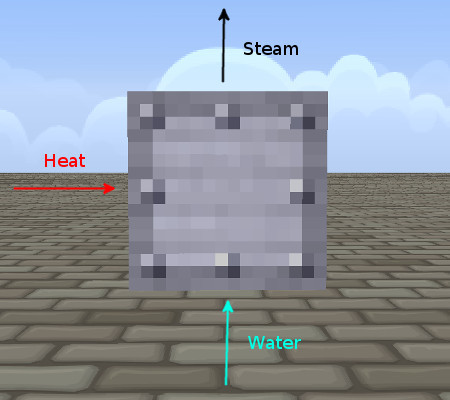
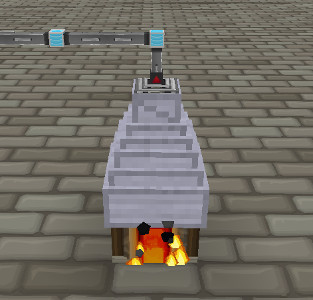
6.2 The steam boiler block
This block turns water and heat into steam. It should sit adjacent to a CO2 heat exchanger block.
It can also use ammonia, but since that explodes at 650 C and the CO2 we use is over 800 C that’s a rather unsafe option and I won’t deal with it here.
6.2.1 Technical details
TL;DR: water in the bottom, steam out the top (but only via steam lines). Steam is made if it’s over 100 C.
A steam boiler needs to be fed water, via the bottom. Steam will be extracted from the top. Note that this steam isn’t the same as for example Railcraft steam, and doesn’t count as a fluid. It can’t be moved around with your usual pipe systems but has to be moved by ReactorCraft steam lines.
A steam boiler needs to be fed water, via the bottom. Steam will be extracted from the top. Note that this steam isn’t the same as for example Railcraft steam, and doesn’t count as a fluid. It can’t be moved around with your usual pipe systems but has to be moved by ReactorCraft steam lines.
A steam boiler block needs to be isolated from air, see Air isolation↓.
The steam boiler needs to be over 100 C to boil water. As long as it is hot enough it’ll turn 200 mB of water and 5 C of heat into 1 block of steam each tick. Since a heat exchanger can easily provide it with enough heat, this means the steam boiler can go through up to four buckets of water each second, using 100 C of heat in that second. It can therefore handle the output of about three and a half pebble bed reactor cores. Since a steam grate at full speed requires 10 steam per second, a steam boiler can supply two turbines.
Note that a fluiduct can only provide 120 mB/t of water [R] [R] At each fluiduct block that connects to something else. You can run an infinite amount of water through a fluiduct network, it’s just the borders where it’s limited., so 60% of what a steam boiler uses at full speed. If you want to run one at full speed you’ll need to use another plumbing system to feed it, such as EnderIO pressurized fluid conduits.
A steam boiler [S] [S] A single block - you can fit three around a heat exchanger block. at 60% of capacity is enough to handle the generated heat of two pebble bed reactor cores though, so you might decide 60% is enough for you for now.
6.3 How to build a heat exchanger
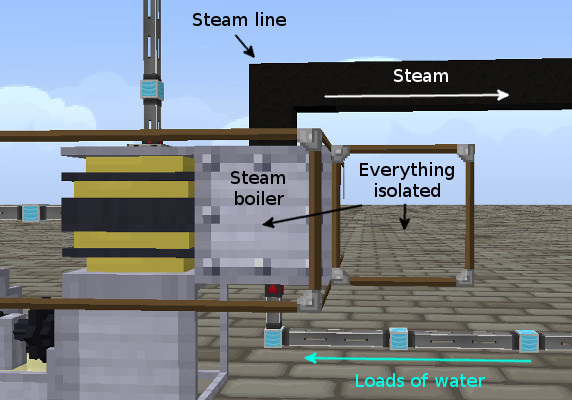
There is really only one sensible design [T] [T] That I came up with. Don’t let that stop you from experimenting and finding your own designs., with a few tweaks in the number of boilers. For proper operation, make sure your heat exchanger can handle all heat produced by your reactor core.
6.3.1 Design A: the center
Since a heat exchanger is vastly more powerful than a boiler, this design has one heat exchanger at the center and tries to fit in as many boilers as reasonable.
- Place a heat exchanger somewhere. Make sure it’s the right type, not a carbon dioxide heat exchanger.
- Hook up RotaryCraft power to the bottom. You’ll probably want to use a bevel gear.
- Connect hot CO2 to the top.
- Extract cold CO2 gas from one of the four sides. I highly recommend that you use the side the bevel gear points to. You’d be blocking space used by boiler plumbing otherwise.
6.3.2 Design A1: one boiler
- Build a design A center.
- Place a steam boiler so it touches one of the sides of the heat exchanger block.
- Pipe water into the bottom of the steam boiler.
- Attach a steam line to the top of the steam boiler.
- Place blocks around the steam boiler (and heat exchanger, for good measure) so there are no blocks containing purely air.
This design can use up to 100 C/s and 4 B/s of water, and produces up to 20 steam/s. Remember that if you use fluiducts it’ll run at only 60% of that capacity.
6.3.3 Design A2: two boilers
Like design A1, just add another boiler to one of the leftover sides of the heat exchanger and hook it up properly. You can work this out yourself, no doubt.
6.3.4 Design A3: three boilers
Since the heat exchanger in design A1 has two extra available sides, you can directly connect three boilers instead of one.
This design can use up to 300 C/s and 12 B/s of water, and produces up to 60 steam/s, enough to run six turbines. If you use fluiducts that’s 160 C/s, 7.2 B/s and 36 steam/s.
6.3.5 Design A7: seven boilers
You can fit an extra four boilers in the corners of design A3. These will not directly receive heat from the heat exchanger though; instead they get second hand heat from the primary three boilers.
If the primary boilers are running at full capacity, the secondary boilers do not receive enough heat to run at full capacity as well. Experimentally, this setup uses between 18 and 20 buckets of water per second at full speed, while seven boilers could theoretically use 28. It’s more than design A3 of course, but you’re definitely starting to see diminishing returns. Still, boilers are cheap enough that I think this is worth it.
If you use fluiducts though, this setup lets you use between 16 and 17 buckets per second, so more than double that of A3.
6.3.6 Designs with even more boilers
You can add more secondary boilers, and then tertiary boilers, and so on - but pretty soon those extra boilers will only add a tiny fraction of extra performance. If you need more than what an A7 heat exchanger can deliver, start building a second one.
6.4 Troubleshooting
6.4.1 Check that the heat exchanger receives enough power.
It needs 8192 rad/s and 512 Nm, fed in via the underside. If it doesn’t get this it won’t do anything.
6.4.2 Check the input tank of the heat exchanger.
It’s Tank 0. It should contain at least 100 mB of Hot Carbon Dioxide Gas. If it doesn’t, see that your reactor is still producing hot CO2.
6.4.3 Check the output tank of the heat exchanger.
It’s Tank 1. It should contain less than 2000 mB of CO2. If it contains 2000 mB, the heat exchanger is unable to get rid of gas and refuses to work. Check your outgoing gas duct and see if there’s still room in the CO2 tank.
6.4.4 Make sure that your boilers do not touch any air blocks
This is explained in Air isolation↓. If they are exposed you’ll waste a lot of heat.
7 Turbine
A turbine is a multiblock structure consisting of the turbine itself (which is also a multiblock) and a steam grate to feed it steam. It’s pretty easy to set up.
7.1 The steam grate block
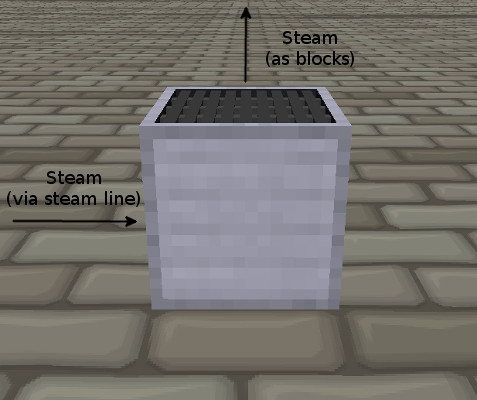
When connected to a steam line with steam in it, this block will produce a stream of steam blocks above it.
7.1.1 Technical details
You need to connect the grate to a steam line. The steam line can touch it at any side but the top. The top is where steam comes out of, so it needs to have a block of air there for the steam to go into.
A steam grate may take up to twice as much steam from a steam line as it actually stores in its internal storage. I don’t know why it’s coded this way.
Steam grates and steam lines store an amount of steam blocks internally. The amount of steam that gets transferred depends on the difference between the two adjacent blocks’s storage amounts. If the difference is 1, then one steam gets moved. If the difference is 2, then still one steam gets moved, and one is lost. At larger differences you’ll lose about half the steam. Note that this is only where a steam line feeds a steam grate. There is no loss between two steam lines.
The result is that, depending on the order in which you built things, the specific layout, and the timing of various systems, you may or may not end up with steam loss. If you get steam loss, you can often make it work properly by breaking and replacing a steam line next to a random working steam grate, or blocking and unblocking random working steam grates, until they all work. If you can’t get it to work properly this way, you may have to hook up each steam boiler to two turbines with a dedicated steam line, so you only have to fiddle with two steam grates at a time.
Every tick, a steam grate will try to make steam in the block directly above it. Since steam takes two ticks to move, in practice that means it can only place a steam block every other tick. Therefore, a steam grate at full speed will use 10 steam per second.
By default a steam grate is on and will try to produce steam. In future versions you will be able to turn it off by applying a redstone signal but the version currently in FTB Monster can’t do that yet. If you have a newer version than ReactorCraft 19b, give it a try.
If that doesn’t work, you can turn off a steam grate by placing a block above it. It won’t waste steam, it’ll just wait until the obstruction is gone. You can of course automate this with a piston.
7.2 The turbine (multi)block
This block forms a structure that turns steam into RotaryCraft energy, completing the reactor.
Beware: turbines contain many large fast-spinning blades. Don’t let anything touch them (except for ReactorCraft steam, obviously). At best you’ll slow down or stop the turbine and waste power, at worst you’ll severely damage the turbine and kill whatever was careless enough to touch the shiny spinning bits of death. Always make a solid, well-lit enclosure for your turbines.
7.2.1 Technical details
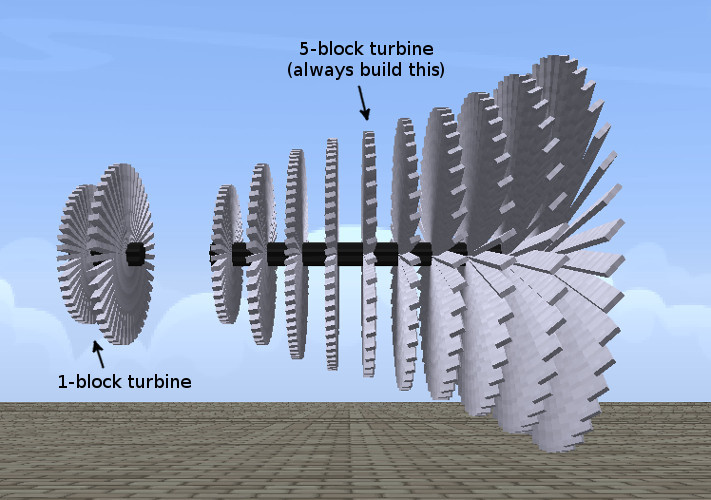
TL;DR: put five in a row. Steam goes up the small end. Power comes out the large end.
A turbine can be made out of one to five turbine blocks in a row. I strongly recommend you always go for five as they become drastically less efficient when smaller.
| Size | Efficiency |
| 1 | 2.5% |
| 2 | 10% |
| 3 | 25% |
| 4 | 50% |
| 5 | 100% |
To generate power, steam needs to float up into the center of the small end of the turbine. From there it will automatically flow along the axis and exit at the large end.

In the 19b version of ReactorCraft you can also float steam up just next to the center of the small end, but this appears to have been disabled in later versions. I don’t think this is an exploit, but to stay forward-compatible I recommend you only use the exact center.
If you place a solid block next to the large end, one block below the axis, steam trying to exit the turbine will be automatically destroyed. If you don’t do this and let it float away it’ll cause rendering issues with the turbine, making it look like it’s flipping out severely. It’ll also take up tick time until it floats off the top of the world.
It used to be that you could feed the steam coming out of a turbine into a second turbine (and so on) but that has been disabled. This was an exploit so if you play on a server where this still works, don’t do it.
A turbine will damage living entities, and will get damaged itself when it shreds some of them (bats, for example). This damage can’t be repaired and you’ll have to replace one or more turbine blocks in order to get back to full efficiency.
A damaged turbine block will show fewer blades than a fresh one.
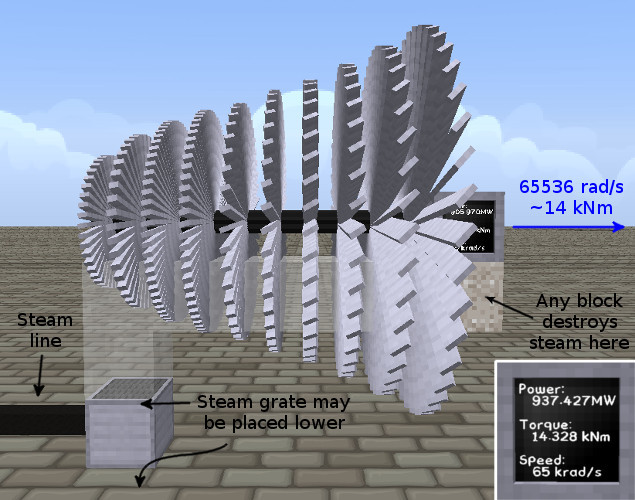
You can see the profile of a turbine in figuere b↑. You can put blocks where the green wool is. Anywhere closer to the turbine will jam it. Jamming it with blocks doesn’t seem to do any damage but I wouldn’t recommend counting on that in the future.
A turbine will produce power as long as it gets fed steam. It will take quite a while to spin up completely (it’s big, after all). Similarly, it’ll keep producing power for some time while spinning down once the steam stops coming.
A typical five stage turbine, fed by a fully operating steam grate, will produce about 920 MW at 14 kNm torque and 65536 rad/s speed.
This speed is the maximum a turbine will do, but the torque can go considerably higher if you feed it with ammonia or multiple streams of steam - but like I mentioned above, multiple streams won’t work anymore in future versions. Anyway, the absolute cap is 65536 rad/s and 32768 Nm, giving about 2.15 GW.
7.3 How to build
- Put five turbine blocks in a row. Make sure they don’t touch anything.
- Place a steam grate somewhere below the axis of the smallest rotor and hook it up to a steam line.
- Place a solid block just below and next to the axis of the largest rotor, to destroy outcoming steam.
- Connect something that uses RotaryCraft power to the large end. A dynamometer goes well here.
If provided with one steam grate at full capacity, this will give you 920 MW (varies a bit) at 14 kNm torque and 65536 rad/s speed.
7.4 Troubleshooting
7.4.1 Check the steam supply
Pretty obvious, but it needs steam. The steam grate needs to be positioned correctly and should be producing steam blocks, which should hit the small end of the turbine right in the axis.
7.4.2 Check for obstructions
A turbine will slow down or stop completely if there’s something blocking it. This could be a solid block, a not all that solid looking block, an invisible block, a fluid, etc.
7.4.3 Check for damage
If the reactor is receiving enough steam but still doesn’t perform well, see if any of the turbine blades is damaged. A damaged turbine block has visibly fewer blades and is really bad for performance. If you find any, replace them and make sure nothing can get into the turbine housing.
8 Water source
Your setup will require a huge amount of water, up to four buckets per second per steam boiler (that’s two buckets per second per turbine, given that a steam boiler can power two turbines).
There are several pumps available in FTB Monster, but they all rely on water blocks replenishing themselves in the world. This causes a lot of block updates and lag if you need to do it fast and/or at a large scale. You can still use them for small reactors but I think you’re better off with one of the options below.
8.1 Aqueous accumulator
This Thermal Expansion block will provide you with half a bucket of water per second (25 mB/t) if next to at least two blocks of water.
8.2 Reservoir
This multiblock, from Ender IO, provides you with one bucket of water per second (50 mB/t).
9 CO2 generator
Your reactor needs CO2 to move heat from the reactor core to the heat exchanger. Since the CO2 doesn’t get used up, you only have to run the CO2 generator when first setting up your reactor, after you lose some in a construction accident, and when you’re expanding your setup.
9.1 How to build
- Place a regular Minecraft furnace.
- Place a ReactorCraft gas collector on top of it.
- Hook the gas collector up to your CO2 tank. You can extract from any side but only from the top looks proper.
9.2 How it works
TL;DR: much coal or wood in bottom slot of furnace, anything that smelts in top slot of furnace.
The gas collector will collect CO2 as long as the furnace below it is burning, and contains either coal or something wooden as fuel. The exact fuel doesn’t matter, it generates 10 mB/t (200 mB/s) of CO2.
The gas collector will collect CO2 as long as the furnace below it is burning, and contains either coal or something wooden as fuel. The exact fuel doesn’t matter, it generates 10 mB/t (200 mB/s) of CO2.
A gotcha here is that if you put one single piece of fuel in and burn it, the furnace consumes it right away and is now working but does not contain coal or wood as fuel anymore, so the collector won’t generate CO2. Similarly, if you put in a stack of coal or wood, as soon as it has consumed the last item of the stack it stops generating CO2 even though the furnace is still on. It must have coal or wood in the fuel slot to generate CO2. For best efficiency you should put in a whole stack of fuel at once, that way only the very last item is “wasted”.
It doesn’t matter if you are actually smelting something in the furnace, as long as it’s on. Of course the furnace won’t turn on unless you give it something to smelt (or cook or bake or whatever), but it won’t matter if the thing you’re smelting takes less time than the burn time of the fuel you put in.
You can calculate how much CO2 you’ll get from the burn time of the fuel. For example, coal has a burn time of 80 seconds so one piece generates 80 s*200 mB ⁄ s = 16000 mB. Since one item in a stack is wasted, a whole stack of coal gives you 16 B*(64 − 1) = 1008 B, enough to start a fairly big reactor.
9.3 How much to generate
TL;DR: your cold CO2 tank should be about half full. It’s not very picky though so don’t sweat it.
If your reactor is working well, all CO2 heat exchangers at the core are full with cold CO2. That’s 12 buckets per exchanger. The plumbing from your cold CO2 tank to the exchangers should be full too. How much that requires depends on what type of plumbing you use, see Plumbing↑.
If your reactor is working well, all CO2 heat exchangers at the core are full with cold CO2. That’s 12 buckets per exchanger. The plumbing from your cold CO2 tank to the exchangers should be full too. How much that requires depends on what type of plumbing you use, see Plumbing↑.
On top of that you should have sufficient spare cold CO2 in your cold CO2 storage tank to run things a while. This tank should not be full though, as your hot-CO2-to-steam heat exchanger will stop working if it can’t get rid of the cold CO2 it produces.
10 Storage tanks
Storage tanks for the fluids you’re moving around will make your reactor more resilient and can even work as a battery of sorts.
You can use any tank system you are familiar with. If you are just starting with nuclear engineering, I recommend OpenBlocks tank blocks as they are fairly cheap and can form a multiblock structure of any shape and size you want. If you are going the really high tech route, I recommend storing the whole lot in an Applied Energistics (plus Extra Cells) ME network.
10.1 CO2 (regular)
TL;DR: a couple dozen buckets for a starter reactor is fine but you can make it as big as you want.
This tank should be big enough to run your reactor for a while, and to receive extra CO2 from your heat exchanger (the one that heats water). Since a heat exchanger (the one in your core, that heats CO2) uses 100 mB/s of CO2 at max speed, multiply the number of exchangers you have by the number of seconds you want your reactor to last if something clogs up elsewhere, and divide by ten.
This tank should be big enough to run your reactor for a while, and to receive extra CO2 from your heat exchanger (the one that heats water). Since a heat exchanger (the one in your core, that heats CO2) uses 100 mB/s of CO2 at max speed, multiply the number of exchangers you have by the number of seconds you want your reactor to last if something clogs up elsewhere, and divide by ten.
For example, a five minute buffer (300 s) for a reactor with one exchanger requires (1*300) ⁄ 10 = 30 buckets of CO2.
In this case your plumbing alone will probably store that much CO2, but for a larger reactor or a longer duration you’ll need a larger tank.
10.2 CO2 (hot)
This tank could be your battery. As long as it contains hot CO2 you can generate power, even if the reactor core is shut down. On the other hand, if your steam-generating heat exchanger can’t handle the load and a backlog of hot CO2 builds up, that also means there will be less and less cold CO2 available to your reactor, which can lead to overheating or lost heat.
You can however opt to have two hot CO2 tanks. One is normally empty and works as a buffer, and one that is normally full but not connected, so you can use it to generate power to re-start things or run your base if the core is shut down.
The main hot CO2 tank should be about as big as your cold CO2 tank. That way the core can run normally for as long as possible if your heat exchanger ever stops working.
10.3 Water
Your water source should be able to keep up with the water use of your heat exchanger at all times, so you probably will not need a water tank. Your plumbing will provide enough of a buffer.
That said, if you want the peace of mind provided by a large volume of readily available water right next to your heat exchanger, go ahead and build one.
10.4 Steam
ReactorCraft steam isn’t a fluid and can’t go in a tank. You can store an infinite amount in your steam lines though so that sort of counts as a tank.
11 Additional info
11.1 Air isolation
Most reactor blocks cool down much faster when exposed to air. This is the reason you can’t get a pebble bed reactor up to a useful temperature unless you fully surround it with something. Here are the facts:
- The number of air blocks don’t matter. One adjacent air block provides the same cooling effect as two to six.
- The cooling effect depends on the ambient temperature, which depends on the biome you’re in. Most biomes are at 25 C, the nether is really hot at 300 C, the end is quite cold, and snowy biomes will probably be cold as well. In the future other things may matter, such as whether it’s day or night, whether it’s raining, and how high you are.
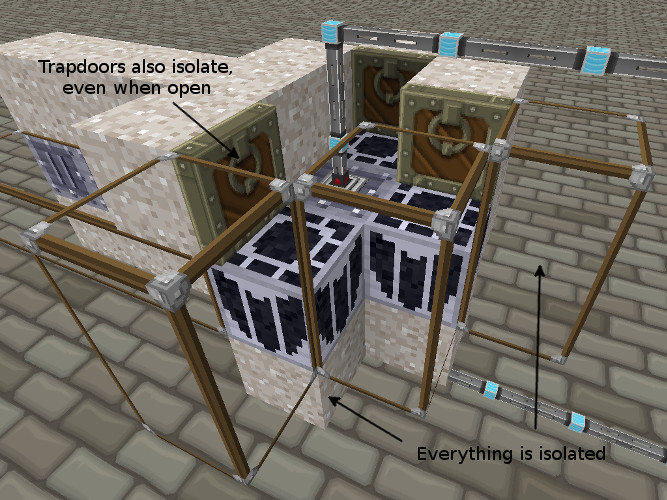
- Blocks that look like mostly air, such as torches, signs, or slabs, still count as not-air and will isolate fully. They do still let you access the reactor block though, so this can be useful.
- Certain reactor blocks react in different ways to things like lava, ice, or water. If it looks like it could have a cooling or heating effect, you should probably not use it for isolation unless you know for sure that it doesn’t do anything.
- If in doubt, use concrete and iron or steel blocks. It’s what real life reactors are built with, after all.